
#3 User Descriptions
User Descriptions
Let's see in detail how to add a user to Daphne.
In the main menu, click on the "Descriptions" vertical tab. In the "Authorization" section, click on the "System users" link.
We are logging in. Click on the New button in the user list.
The username is limited to 60 characters and cannot be changed later. You can use a short name, email address, or active directory name. If you are using active directory, you do not need to use an additional password.
Usernames must be kept in the system even if the staff user no longer exists, do not delete them.
We enter the information of the user we want to add. We select an application role and then the branch where the user will enter records.
When we click the Save button, the application adds the user but redirects to the edit screen to make detailed definitions.
First, we need to match the user with a personnel record. Every staff may not be a user, but every user will be a staff member.
User email address is also an important field, make sure you enter it. It will be used for warning messages sent by the system.
No further information is required to define the user, details are found in the employee description screen.
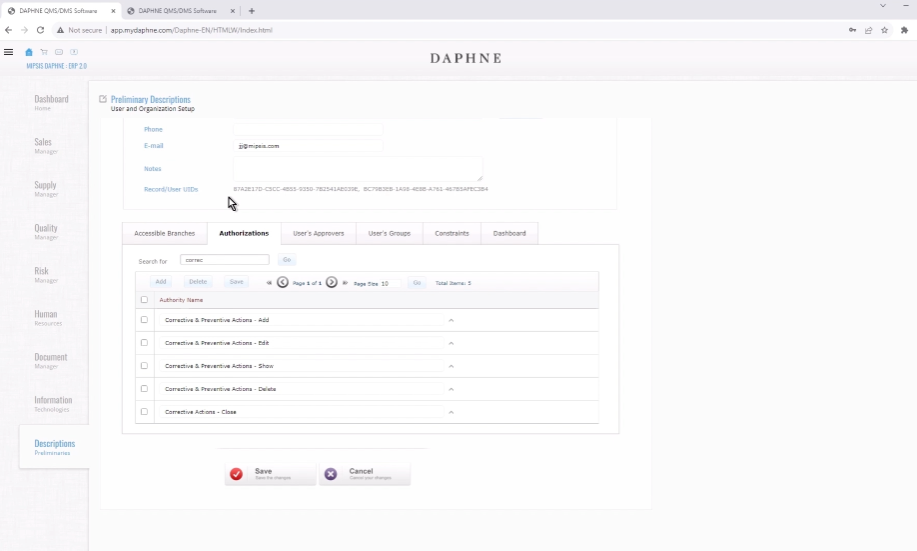
All authorizations for the selected role are listed under the "Authorizations" tab. In this case, the list shows the authorizations of the Human Resources Manager.
If you want to change the user's role to another one or if you want to restore the default values, you need to click on the "Reset rights" button.
Let's remove the show permission of the corrective action screen.
Select the checkbox and click the delete button on the list.
Re-login is required for user permissions to be active. So let's log in.
When we go to the corrective action screen, we get a forbidden message. We had removed the permissions and now we cannot enter the screen.
Now let's add the permission again.
Let's click the "Add" button in the "Authorization" tab, and a selection list called "large list selector" will open. In this list, we can search and select large records.
It is used similarly in all other screens. We have searched and selected the record.
We are back on the corrective actions screen.
This time we see the list of records and we don't get any error messages, but we can't see any records. This is because of restrictions.
Let's remove the restriction row of the "Corrective Actions" table in the Constraint tab of the user definitions.
It is effective without logging in again. We access all records without restriction.
In the "Only own entered records" option, it can only see its own entered records.
The behavior of the "Only associated records" option varies depending on the tables and can be customized by SQL procedure.